|
Guide to Using the Windows Version of the
Liberty Virtual Courtroom Program
This page provides a guide to the features and functions of the Virtual Courtroom Program for Windows.
Test and Confirm the Microphone and Speaker Configurations
The "Audio Settings" Window allows the user to:
- Test both the microphone and the speakers to be used by the Virtual Courtroom program.
- Change either or both of these audio devices using drop-down selection menus that are found on the Window.
To access the "Audio Settings" Window, from the "Microphone icon" drop-down menu select "Test and Confirm Audio Settings" as seen in the screen capture below.

To confirm the configured microphone, speak into the microphone and watch the microphone meter bounce, as seen in the screen capture below.
The meter reading should extend at least into the low yellow area.
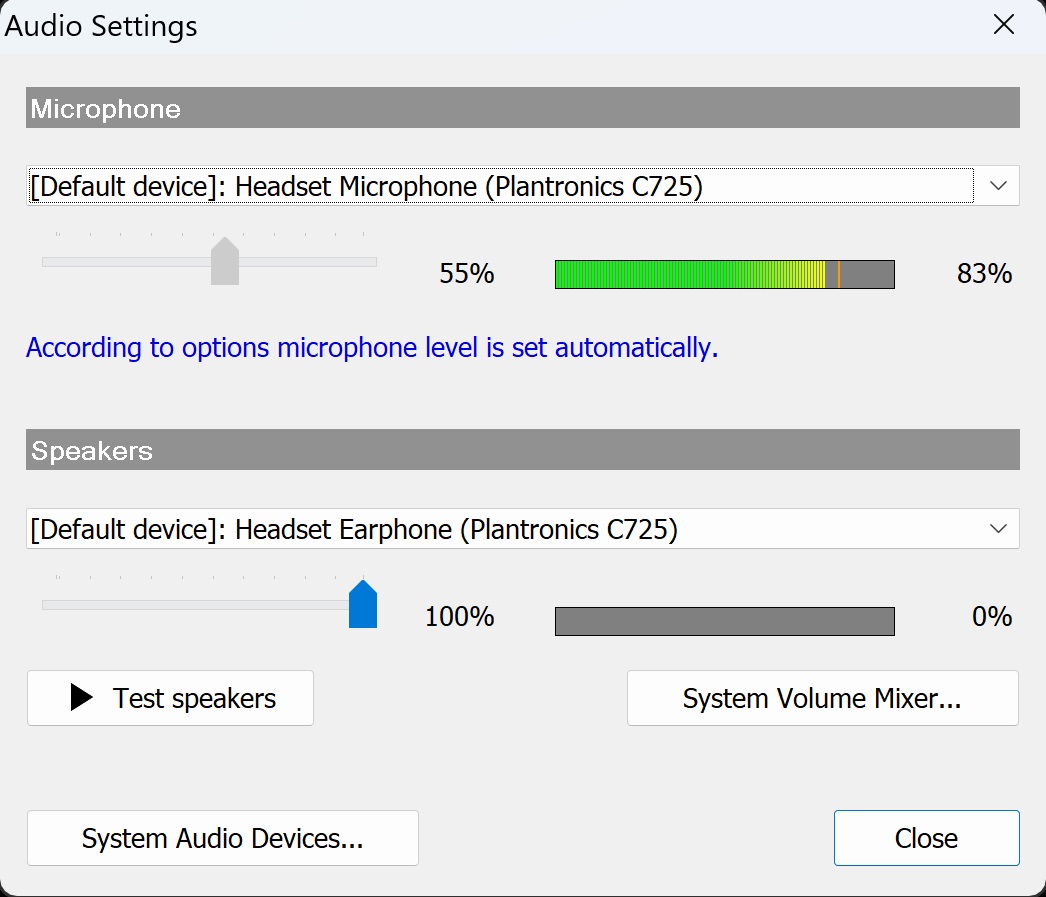
To confirm the configured speakers click the "Test speakers" button.
This causes music to play out of the configured speakers.
Click the "Test speakers" button a second time to stop the music playback.
Logoff / Logon Button
This button toggles between
logon and  functions.
logoff functions.
logoff  functions. functions.
When the virtual courtroom program starts, the program will attempt to automatically logon to the conference server.
If the logon is successful, the button will appear as Log off and clicking the button
will log off and disconnect the program from the server and the conference.
If the logon has failed, or if the program is not set for automatic logon, then the button will appear as Logon and clicking this button
will cause the program to try to logon to the server.

Permanent users may have multiple configuration profiles available for logon.
To access the available configuration profiles, use the "Logon Button icon" drop-down menu as seen in the screen capture below.

Mute Microphone Button and Microphone and Speaker Selection
The following screen shows the Mute Microphone button and the Microphone Selection drop-down control.

To mute the microphone so that other conference participants do not hear your audio, click the Mute Microphone button.
Clicking this button a second time unmutes the microphone.
To change the microphone being used, click the Microphone Selection drop-down control and choose the correct microphone.
The following screen shows the Mute Speakers button and the Speakers Selection drop-down control.

To mute the speakers so that you cannot hear the conference, click the Mute Speakers button.
Clicking this button a second time unmutes the speakers.
To change the speakers being used, click the Speakers Selection drop-down control and choose the correct speakers.
Camera Selection Button
The following screen shows the Block Video button and the Video Camera Selection drop-down control.

To block the video so that other conference participants will no longer see your video, click the Block Video button.
Clicking this button a second time unblocks the video.
To change the camera being used, click the Video Camera Selection drop-down control and change your device.
Leave Private Room Button
The "Leave Private Room" button removes the participant from a private room and returns them to the main courtroom conference.
Note that this button is only active if the participant is already in a private room.

Share Screen Button
The following screen indicates the Share Screen button.

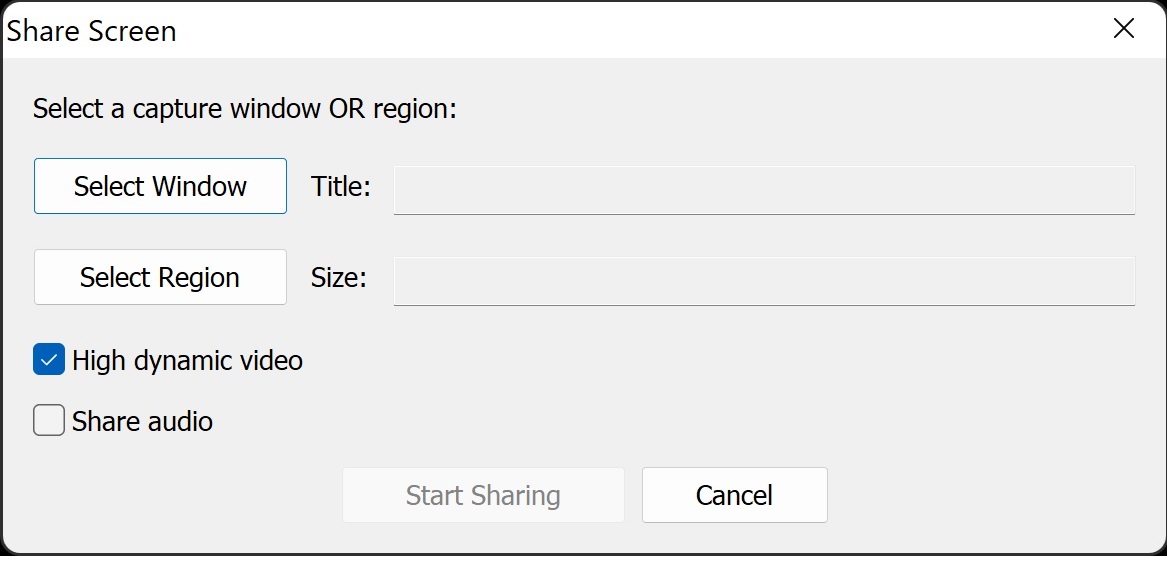
When you choose to share your screen, a new window appears that lets you choose the portion of the desktop that will be shared.
This can be a specific region of the desktop or a specific Window or application.
Follow the instructions on the screen as seen below to start screen sharing.
Gesture Buttons
The following screen indicates the Gesture buttons. By selecting any of these buttons, the selected gesture will appear on the video for the user.

Message Buttons
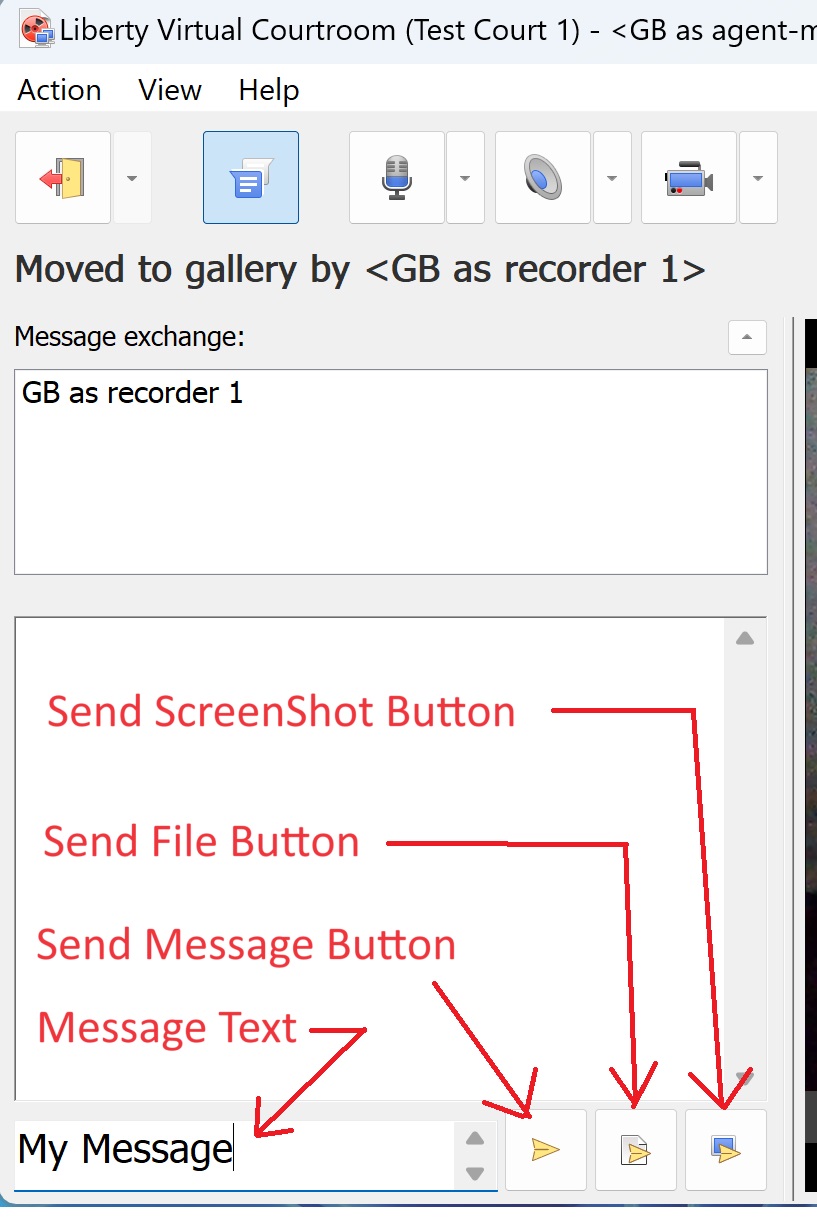
The following screen indicates the Message feature buttons. Once connected to the court, the user may message to the clerk, or
send a file to the clerk, or do a screen capture and send such a capture to the clerk.
Video Right-Click Options
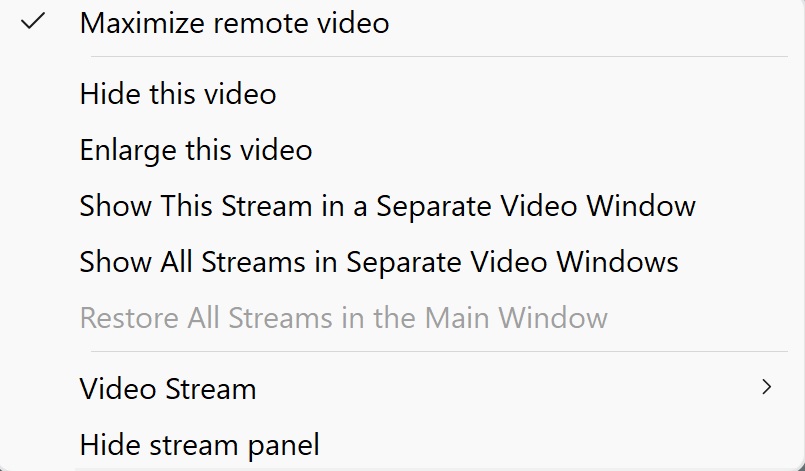
Right-clicking on any of the videos allows you to change the following video settings:.
- Maximize remote video, moves the local camera video into a thumbnail in the top-right corner of the Window.
Alternatively, you can use the Action menu to perform this function.
- Show this video, shows the selected video. Hide this video hides the selected video.
- Enlarge this video, makes this video stream larger than the other video streams, but still keeps the video inside of the overall Window.
- Show this stream in a separate Window, opens a new Window for this video stream only. The new Window may be located and sized according to your needs.
- Show all streams in separate Windows, opens new Windows for each of the video streams. Each of the new Windows may be located and sized according to your needs.
- Restore all streams in the main Window, returns all of the streams from separate Windows into the main video Window.
- Video stream allows for showing or blocking the various video streams.
- Hide stream panel closes the stream panel seen on the left side of the video Window.
Action Menu Drop-Down List
From the Action menu, you can choose from the following:
- Logout and Logon allow you to log off from, or log on to, various configured conference servers.
This is the same as using the Logon/Log off button on the main screen.
- Open Downloads Folder, opens a File Explorer window to the folder where Virtual Courtroom files are sent when transmitted by the courtroom.
- Mute Microphone, mutes the audio from the microphone. This is the same as clicking the Microphone Mute button on the main screen.
- Mute Speakers, mutes the audio from the speakers. This is the same as clicking the Microphone Speakers button on the main screen.
- Block video, blocks the video from your camera. This is the same as clicking the Camera Block button on the main screen.
- Share screen, allows you to share a portion of your screen, or an application that is open on the screen.
- Leave private room, sends the participant from a private room back to the main virtual courtroom.

View Menu Drop-Down Menu
From the View menu, you can choose from the following:
- Always on top
causes the Virtual Courtroom application to stay on top of other desktop applications.
- Show Message Exchange
displays the message exchange controls in the Virtual Courtroom Window. Unchecking this option hides the messasge exchange area and controls.
- Show Audio Levels
displays the audio levels associated with conference participants. The audio levels are shown below the participant video.
- Highlight active Speaker
uses a color band around the video for the active speaker in the conference.
- Test and Confirm Audio Settngs
opens the LVC Audio Settings Window where the microphone and speakers used with LVC may be tested or changed.
- Options allows you to display and change your configuration options for the Virtual Courtroom program.

Help Menu Drop-Down List
From the Help menu, you can choose from the following:
- Help Topics opens the online Help for the program.
- Open debug folder opens Windows Explorer to the folder where debug diagnostic trace files are found.
- About displays the version of the installed Virtual Courtroom program.

| 
