 |
User Guide to the |
 |
User Guide to the |
|
User Guide to the Conference Manager for Introduction This page serves as a User Guide for court staff responsible for managing Liberty Virtual Court conferences. We recommend that court staff begin by watching the short, 10 minute tutorial video linked below. The video serves as a quick introduction to managing the Liberty Virtual Courtroom using the Conference Manager Window. Overview and Diagram of the Hybrid / Virtual Court The Liberty Hybrid / Virtual Courtroom allows a court of record to capture the audio and optionally the video of a hybrid or virtual court session conducted over the Internet or over regular telephone lines. The primary difference between the Liberty Hybrid / Virtual Courtroom and other general-purpose conferencing systems is that the Liberty system captures the audio and optionally the video from each participant into individual audio and video channels. Capturing each participant in their own audio channel later allows a transcriptionist to accurately transcribe and certify the resulting transcript of the court session. When using the Liberty Hybrid / Virtual Courtroom program, each remote participant first connects to a Conference Server based on the Internet and must then wait in the Conference Server "Lobby" until they are connected to the courtroom by authorized court staff. Remote participants have only a subset of system functions and cannot in any way initiate a session with the courtroom. Conference Servers act as funnels and do not save any of the transmitted data. Recording files are only saved onto the recording computer. Other files and other data are not saved anywhere other than the recording computer. All of the audio / video data, and all other data transmitted during the conference is encrypted using standards and protocols defined in the U.S. National Institute of Standards and Technology (NIST) Special Publication 800-131A. The diagram below shows an overview of the required setup. The three remote participants are connecting to the court over the Internet. The court has provided the necessary sound system (DSP) and the cameras required to allow the remote participants to see various views in the courtroom, such as the judge, witness and attorneys.
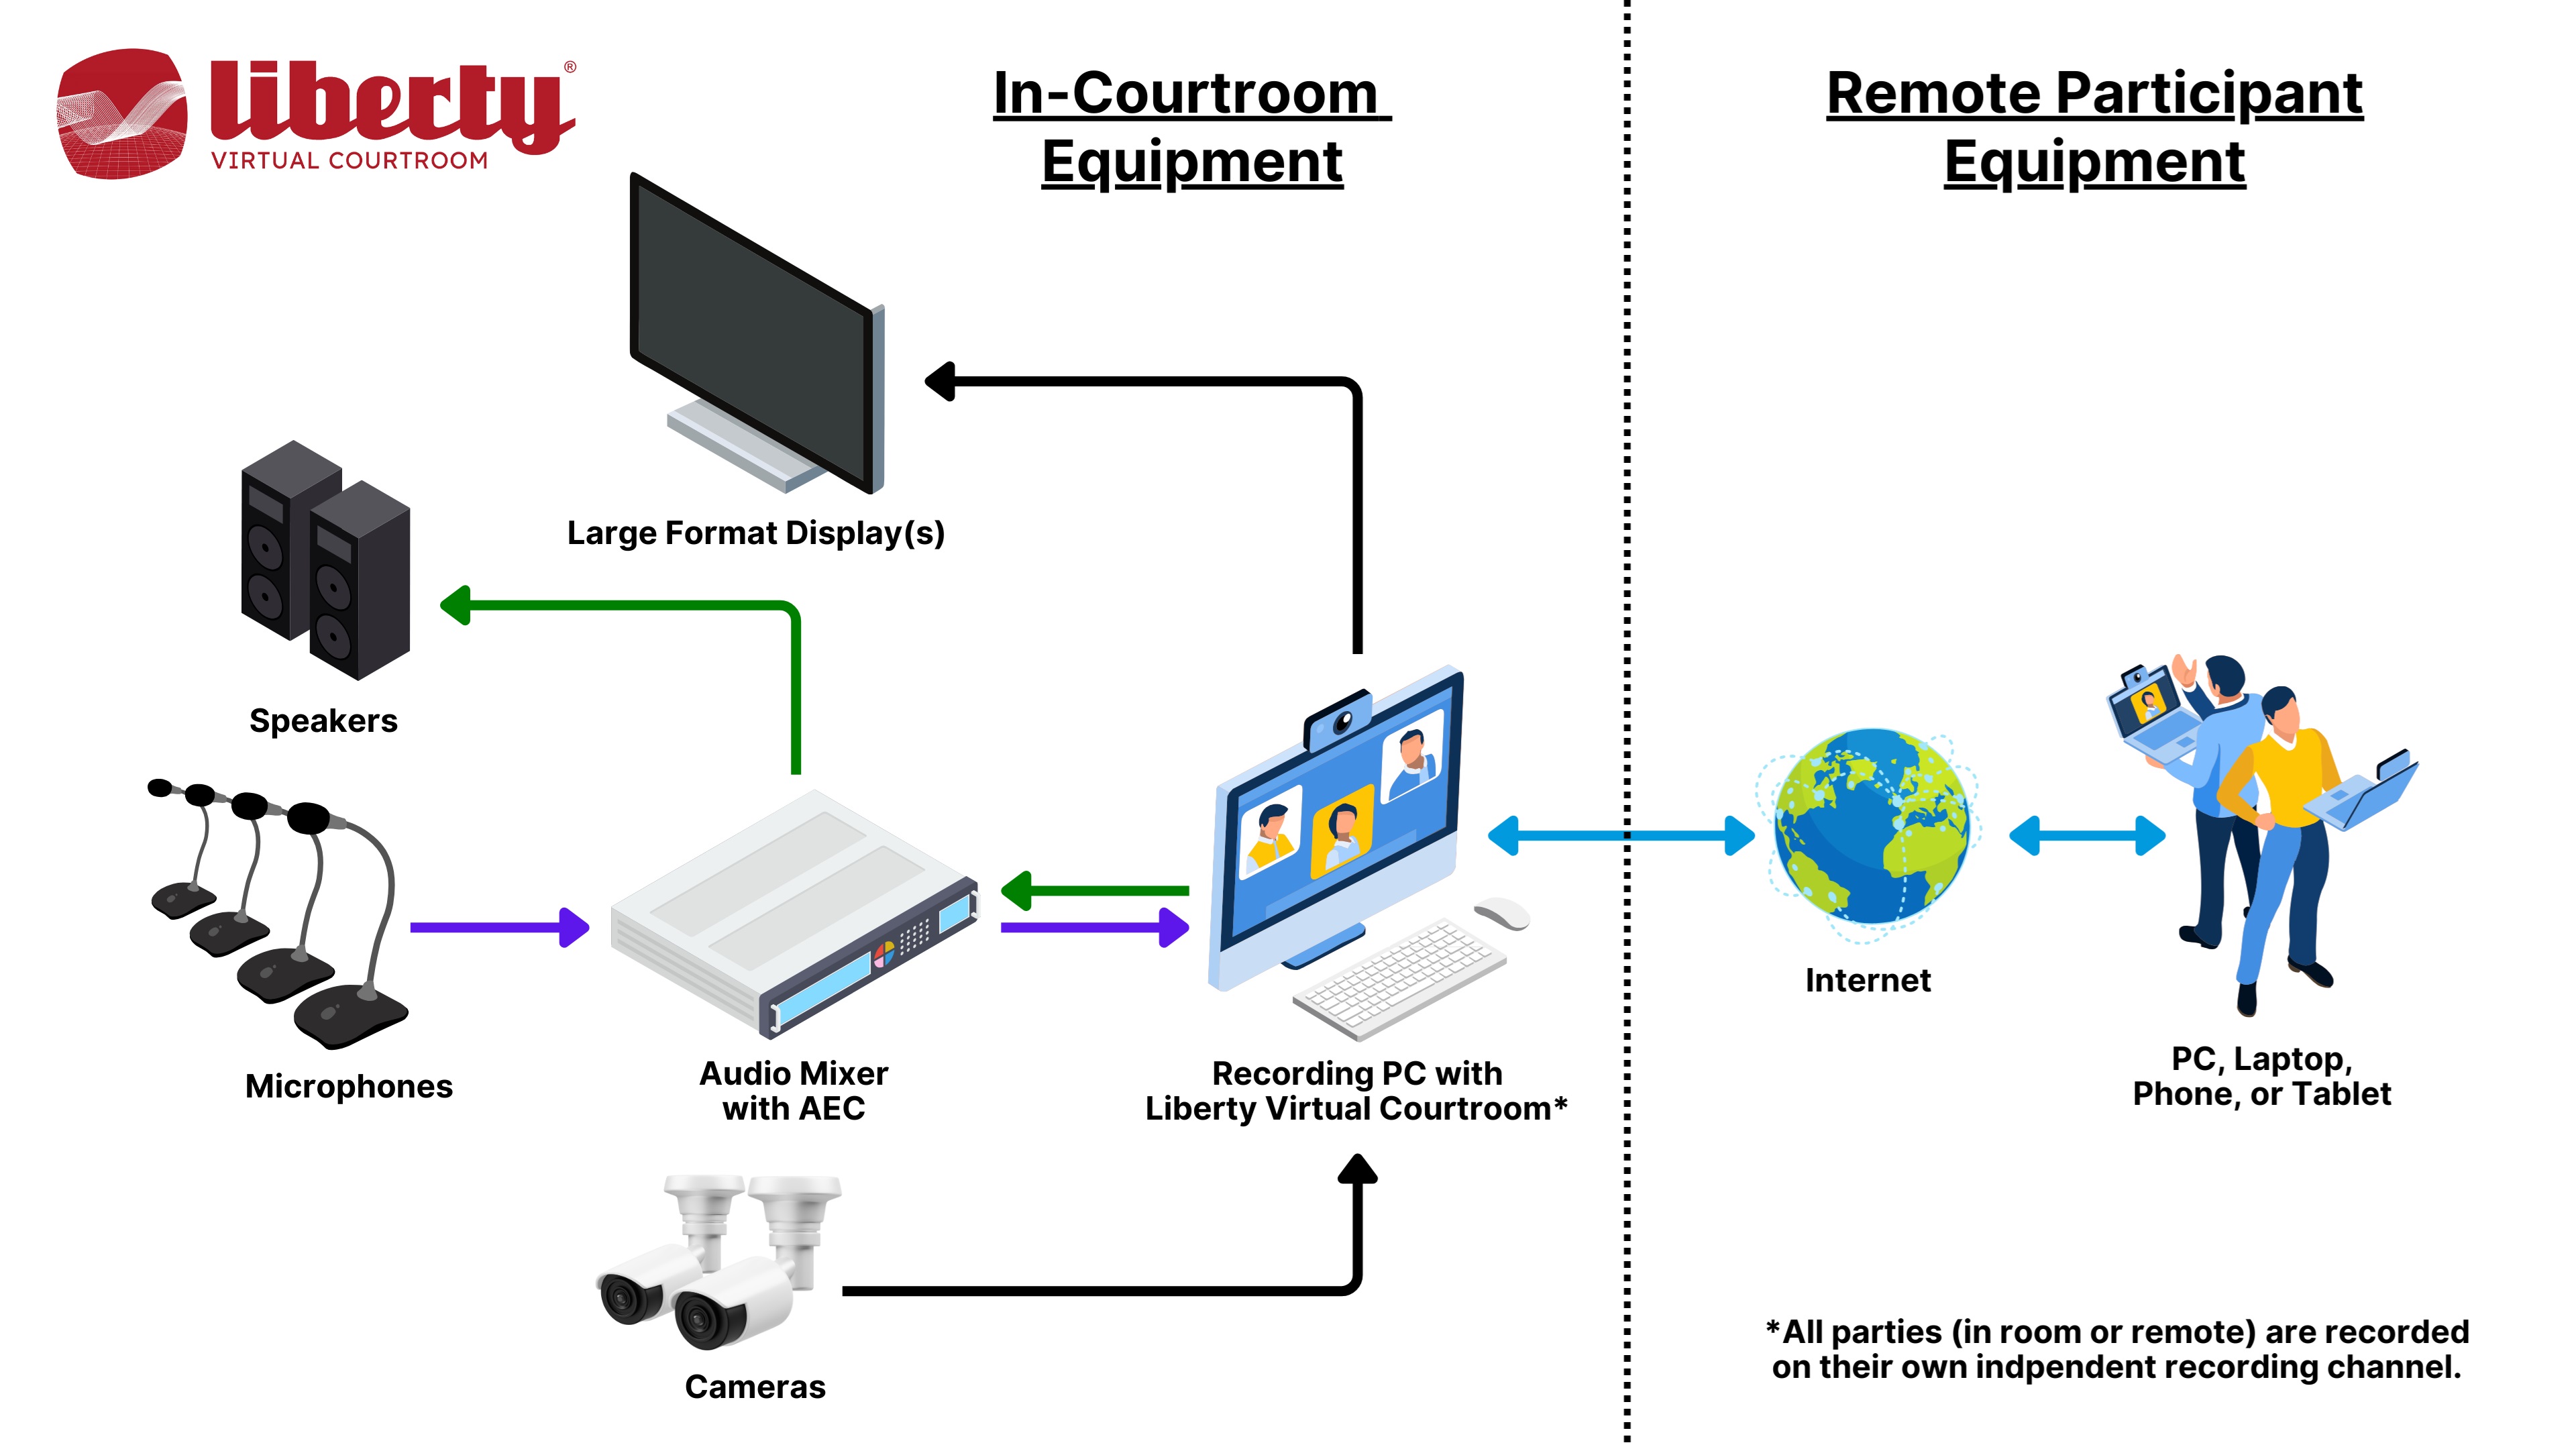
Managing Remote Participant User Definitions Your supplier will provide the court with signon details for permanent virtual courtroom users as well as access to a website where temporary participant links and Phone Codes can be generated.
Three Possible States for Virtual Court Participants There are three states through which participants move in the Virtual Courtroom.
Initiating a Virtual Court Conference with the Remote Conference Manager Window
Virtual Court conferences are initiated and managed at either the recording computer, or at a pre-authorized staff computer using the Windows version
of the Virtual Court program.
If the conference is to be recorded, then the Recorder program must have previously been started and recording must be activated.
Once recording has begun, the operator can bring remote participants into conference.
To open the Remote Conference Window in the Recorder, click the Remote Conference Manager icon on the toolbar, as shown below.
The screen capture below shows an example of the Remote Conference Manager interface, with the main part of the window on the left and the Lobby Panel on the right. The main part of the window shows those remote participants who are either in the Gallery or in conference. These participants can hear the audio, see the courtroom video, can speak to the court, and are being recorded into their own audio / video channels. From this window, you can move participants into conference, return participants to the Lobby, make notes, terminate connections, block video, move participants to private rooms, and perform other actions. The Lobby Panel displays those remote participants who are in the Lobby and are not yet connected to the courtroom. These participants are not being recorded and they cannot see or hear any of the courtroom activities while they remain in the Lobby. From this Panel, you can move participants into the Gallery or the conference, search for docket numbers, assign/remove a preferred attribute, make notes and perform other actions. In the example below:
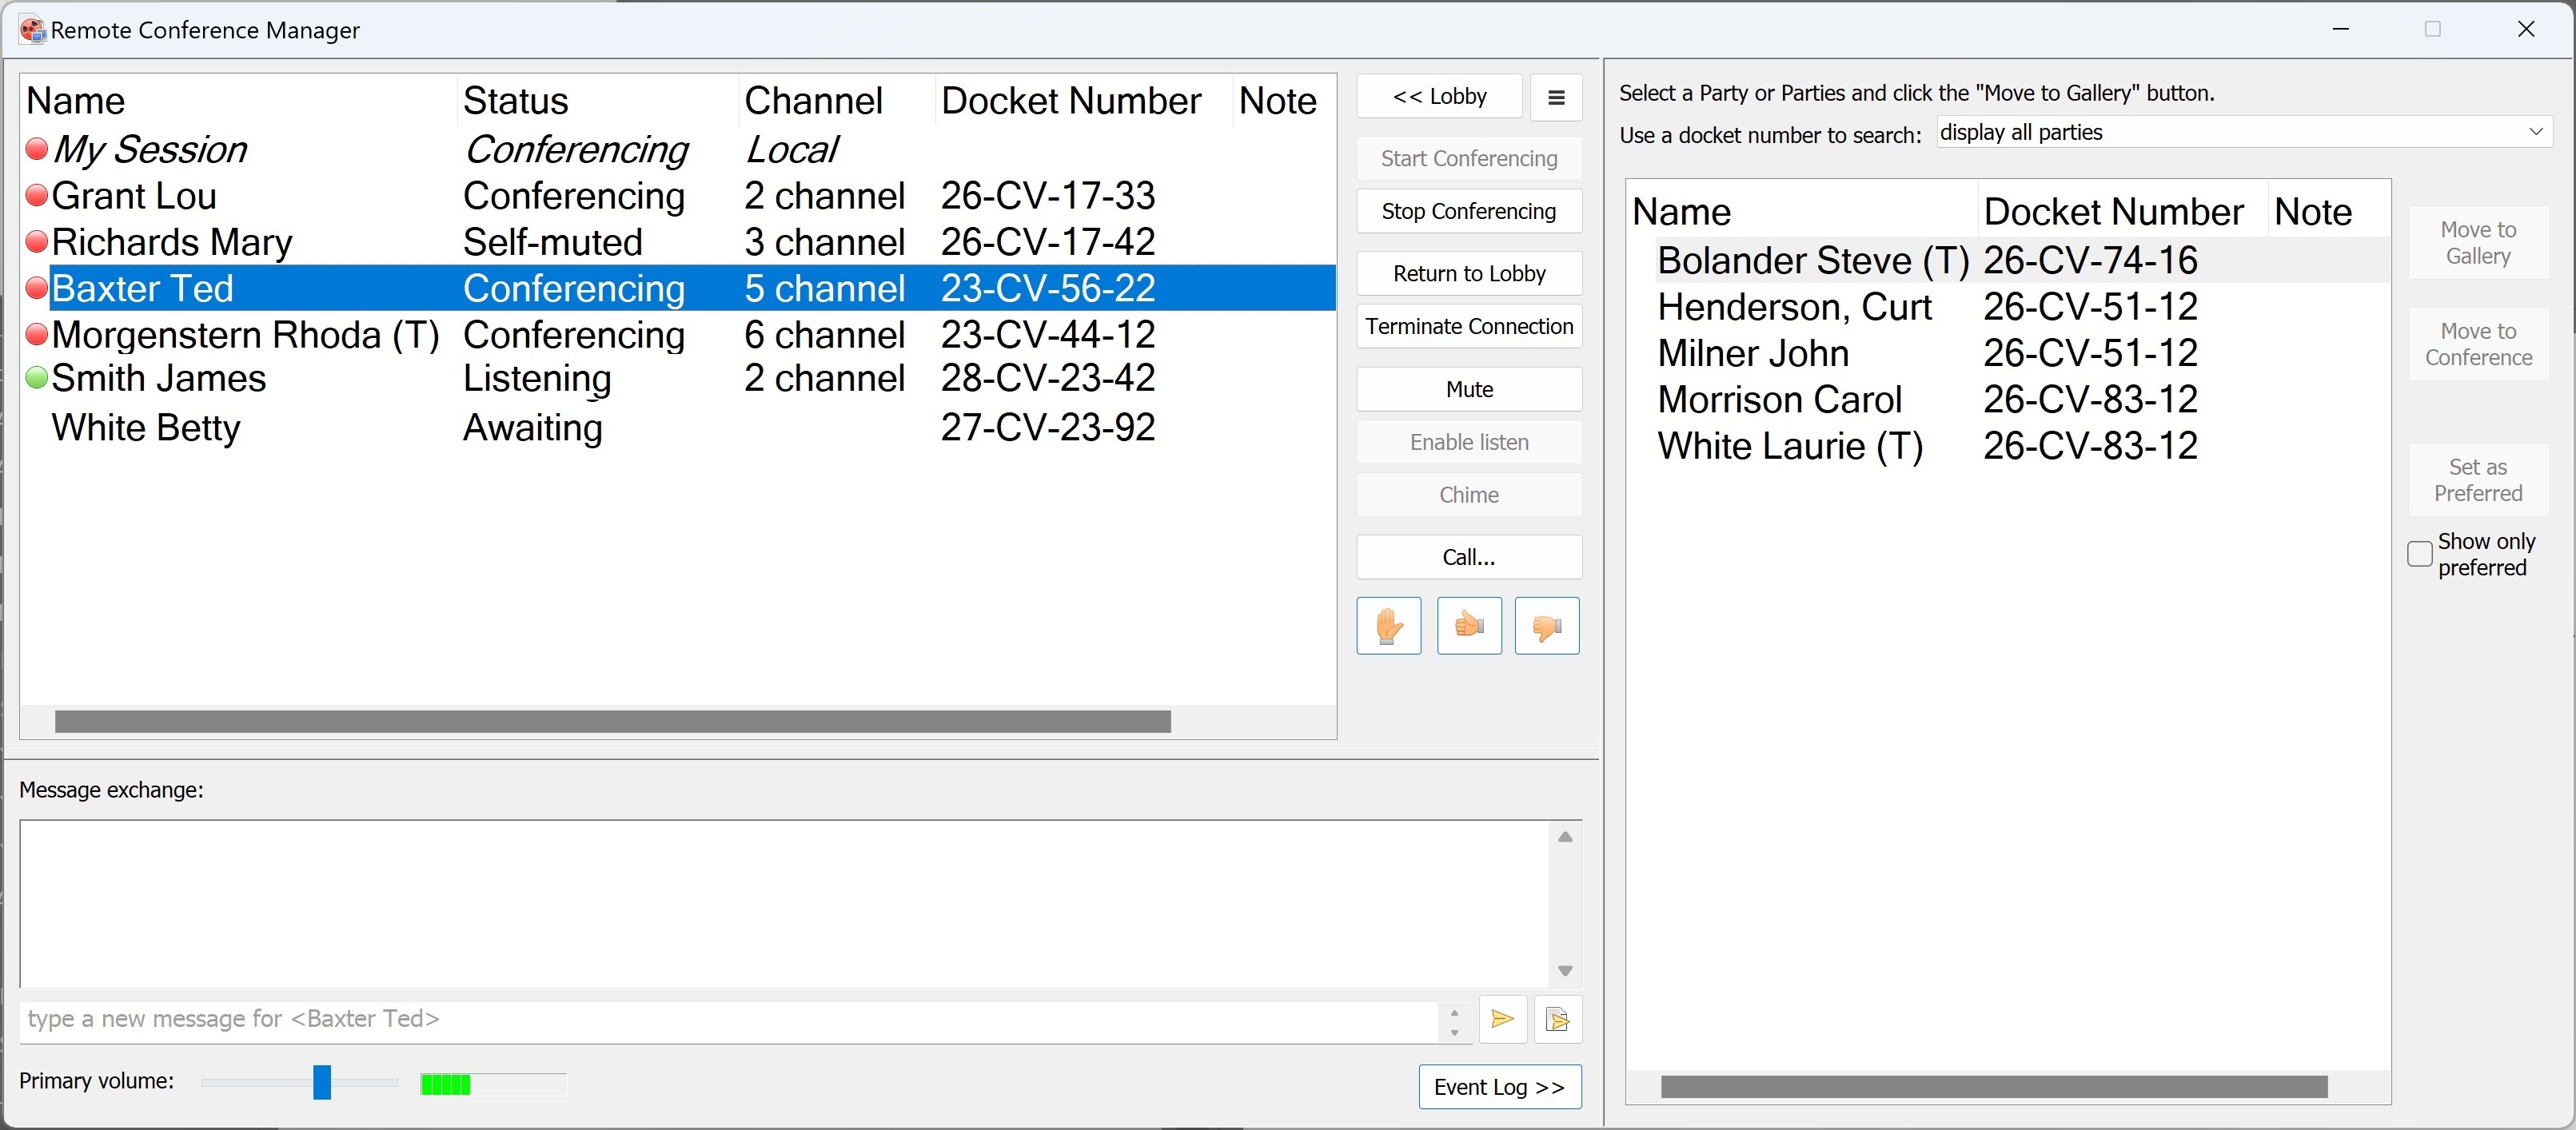
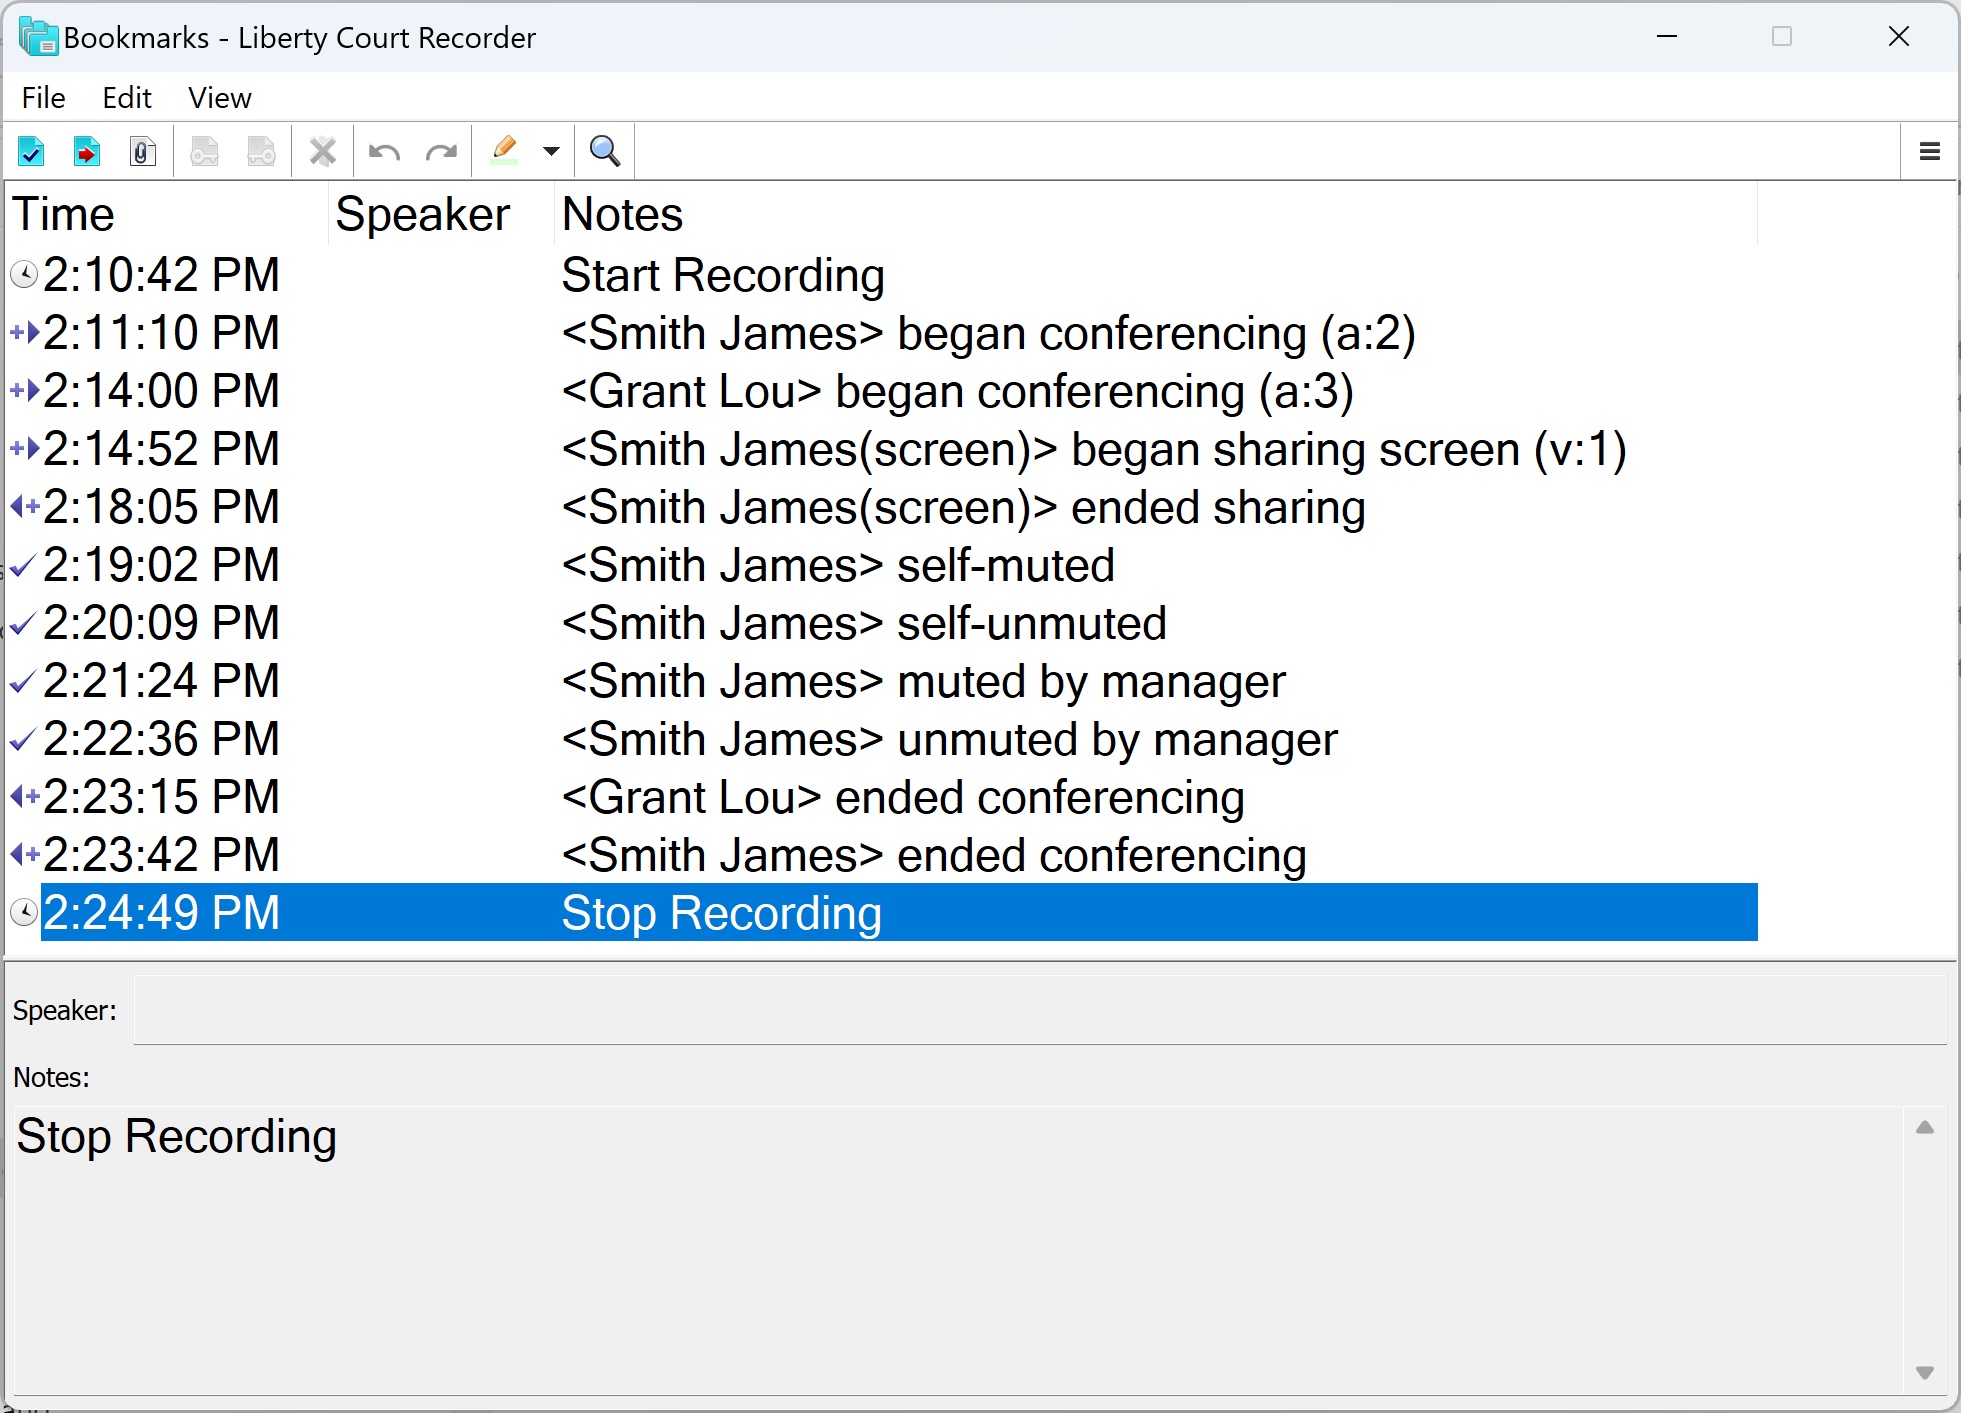
The operator may allow "Waiting" participants to hear the courtroom activities by using the "Enable listen" button on the main Window. Alternatively, participants may be placed into Listening mode by default when entering the Gallery by selecting the "Enable Listening as default for users moved to the gallery" check box in the Remote Conferencing settings of the Recorder. Automatic Conference Bookmarks The conference facility will automatically create bookmarks as participants begin and end conferencing, share their screen, and are muted. An example of some of the automatic bookmarks is shown below.
Customizing the Conference Manager Window Display The Remote Conference Manager Window, along with the associated columns, should be adjusted to best fit the monitor and accommodate local requirements. The Lobby Panel can be toggled open and closed by clicking the Lobby button on the main part of the window You can resize a column by selecting its boundary and dragging it to the width you want. You can right-click on the Title rows to show or hide different columns, as shown below.

Using the Lobby Panel When remote participants first logon to the system, they connect over the Internet to the Conference Server. At this point, they appear in the Lobby Panel of the Remote Conference Manager Window but they are not connected to the courtroom in any way. An example of the Lobby Panel is shown below.
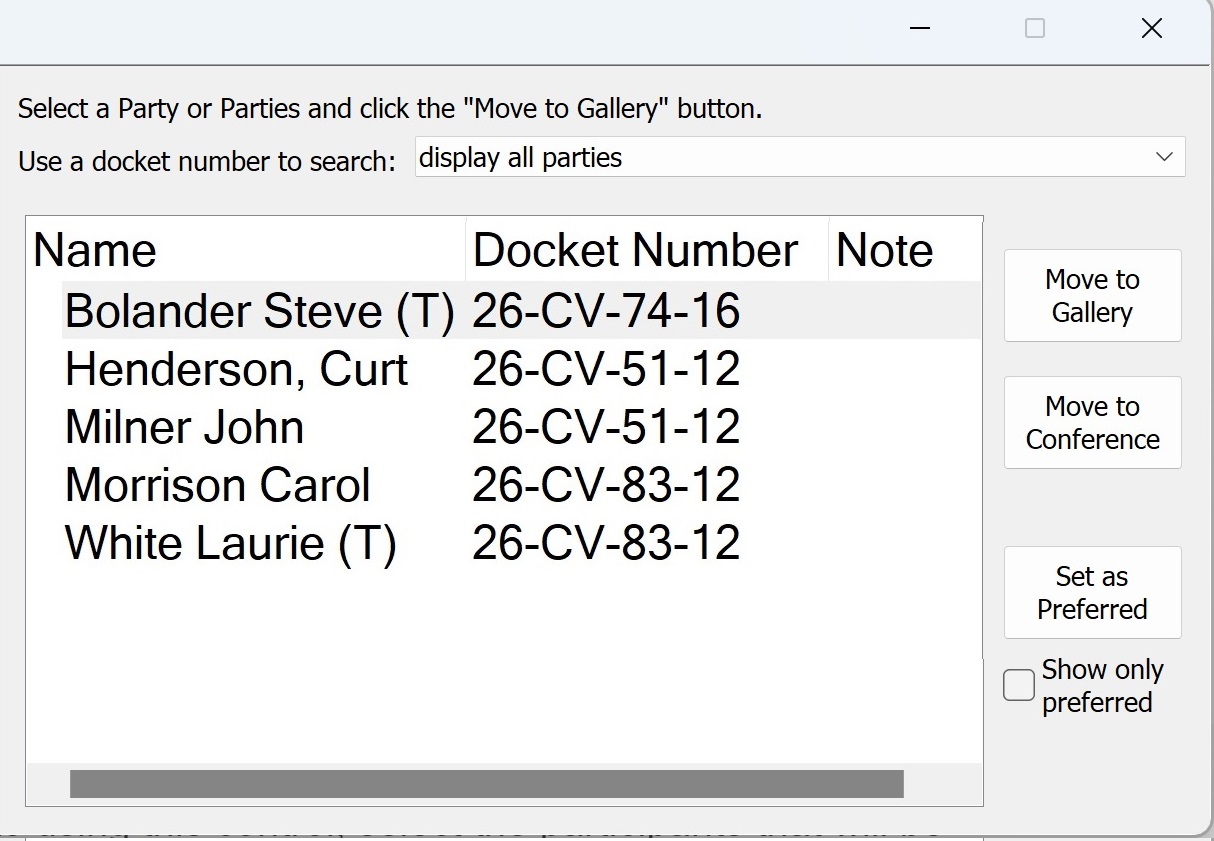
The Lobby panel includes the controls described below. Docket Number Search The Use a docket number to search field can be used to search for a specific docket. The drop-down list displays all of the unique docket / case numbers that have been specified by the remote participants as they logon. You can select any of these docket numbers and the Lobby display will show only those participants who have entered the selected docket number. To display all the participants in the Lobby, select "display all parties". Move to Gallery Control The Move to Gallery control moves selected participants from the Lobby into the Gallery. To move a participant into the Gallery:
Move to Conference Control The Move to Conference control moves selected participants from the Lobby directly into conference, without first being placed into the Gallery. When moved into conference, the participants will be heard by the courtroom and will be recorded. To move a participant into Conference:
Set as Preferred Control The Set as Preferred control assigns the "Preferred" attribute to selected participants. This is used to increase the operator awareness about certain participants. Preferred participants will always appear higher than non-Preferred participants in user lists on the Lobby and Remote Conference Manager Windows. By selecting the Show only preferred check box, you can limit your display to only preferred participants. Note: This control toggles between "Set as Preferred" and "Remove as Preferred", depending upon the current Preferred status of the selected user. Preferred status stays with a participant across multiple court sessions and can be used for both Permanent and Temporary participants. To change the preferred status of a participant:
Sending Text Messages to Participants in the Lobby The operator may initiate text messaging with participants in the Lobby. For more information, refer to "Message Exchange Facility". Other Actions for Lobby Participants Right-clicking on a participant in the Lobby opens a menu as shown and described below. You can also use Ctrl+Click and Shift+Click to select multiple participants before your right click.
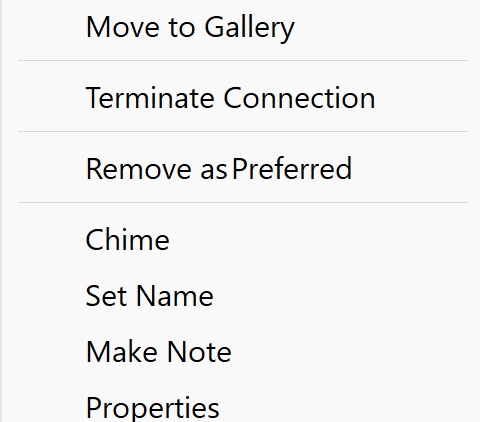
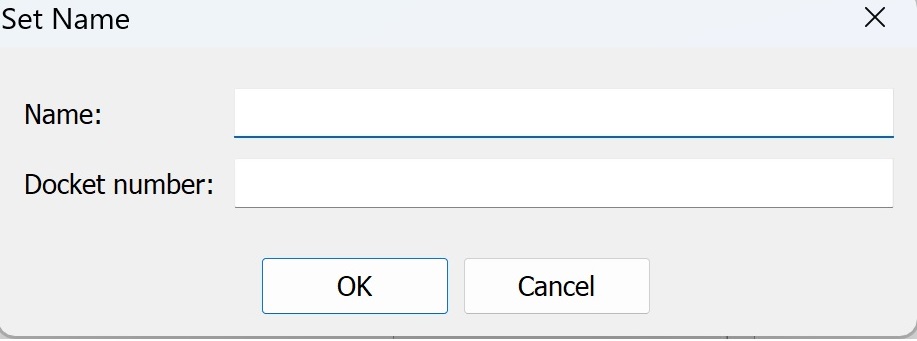
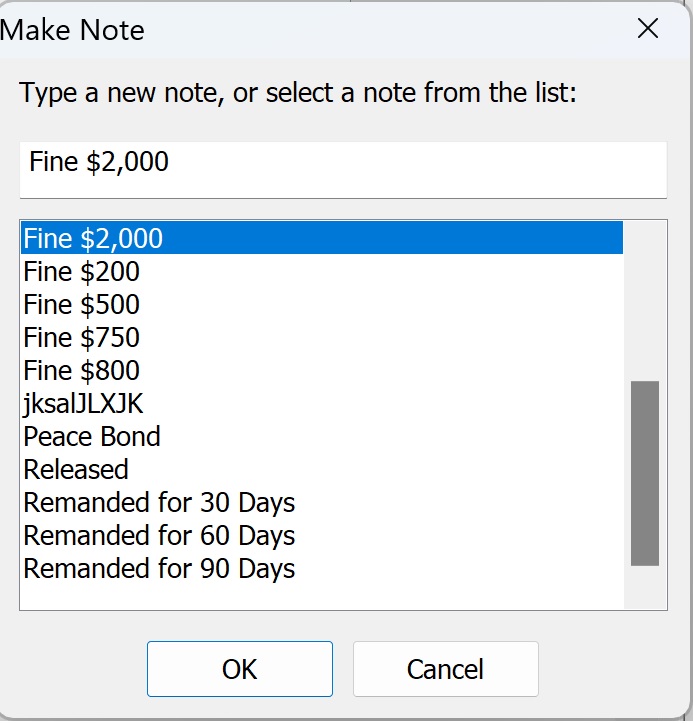
Using the Main Remote Conference Manager Window Functions The controls on the Remote Conference Manager Window are shown and documented below.
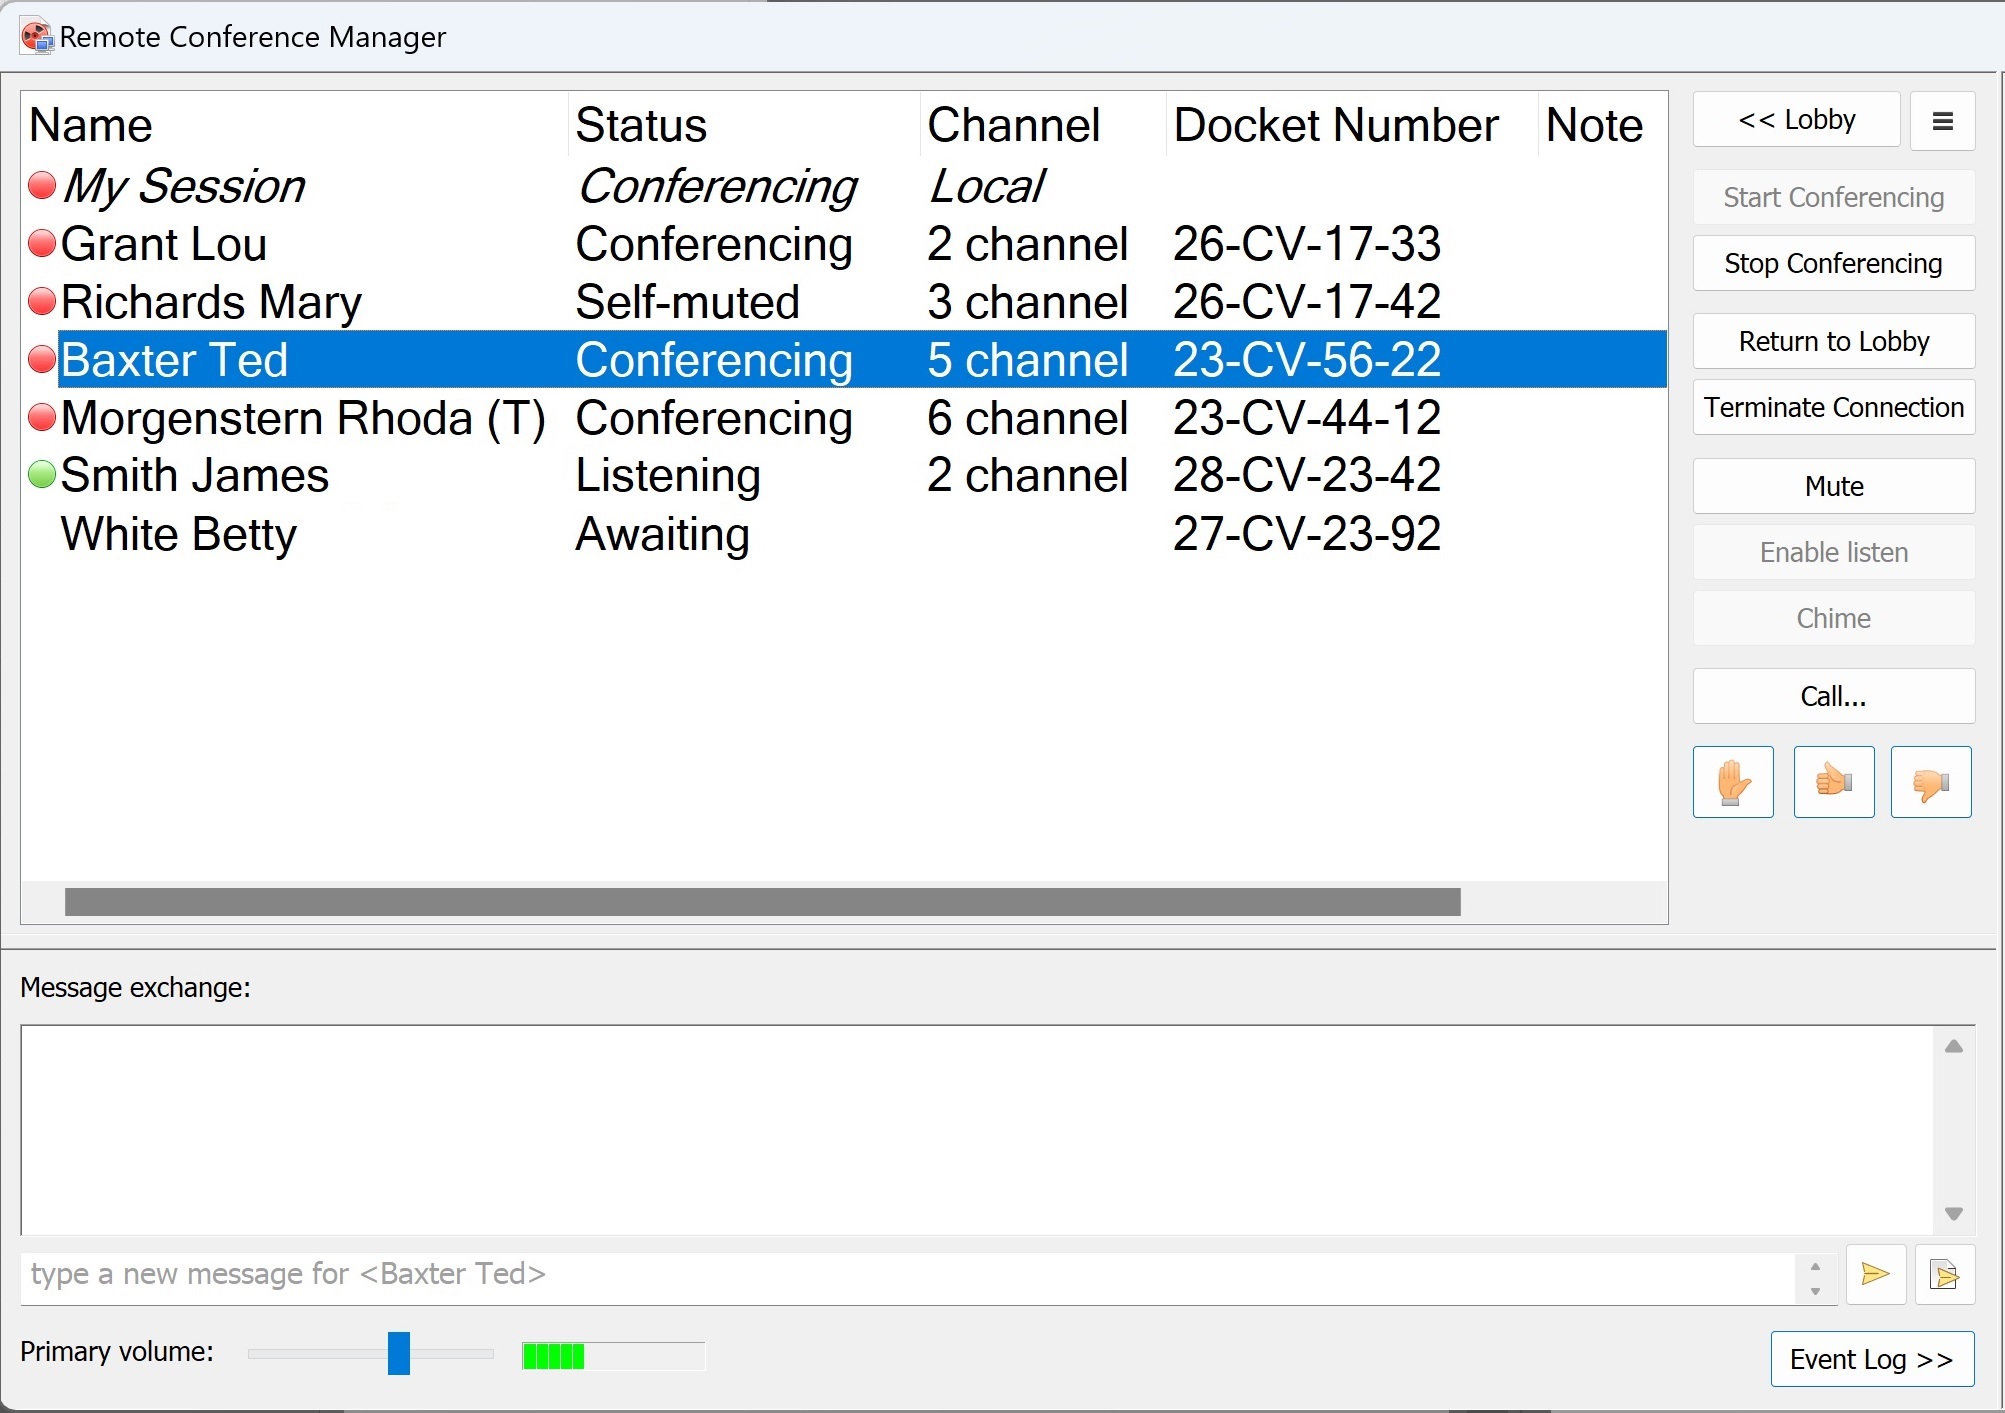
Lobby Control Clicking the Lobby control button opens or closes the Lobby panel, depending upon the panel's current status. Extended Menu Functions On the Remote Conference Manager Window, the Extended Menu Functions button is located directly to the right of the Lobby button. Clicking this button opens a menu of additional functions, as seen in the screen capture below.

Share Screen This function lets you share the desktop screen with remote participants. To share your screen:
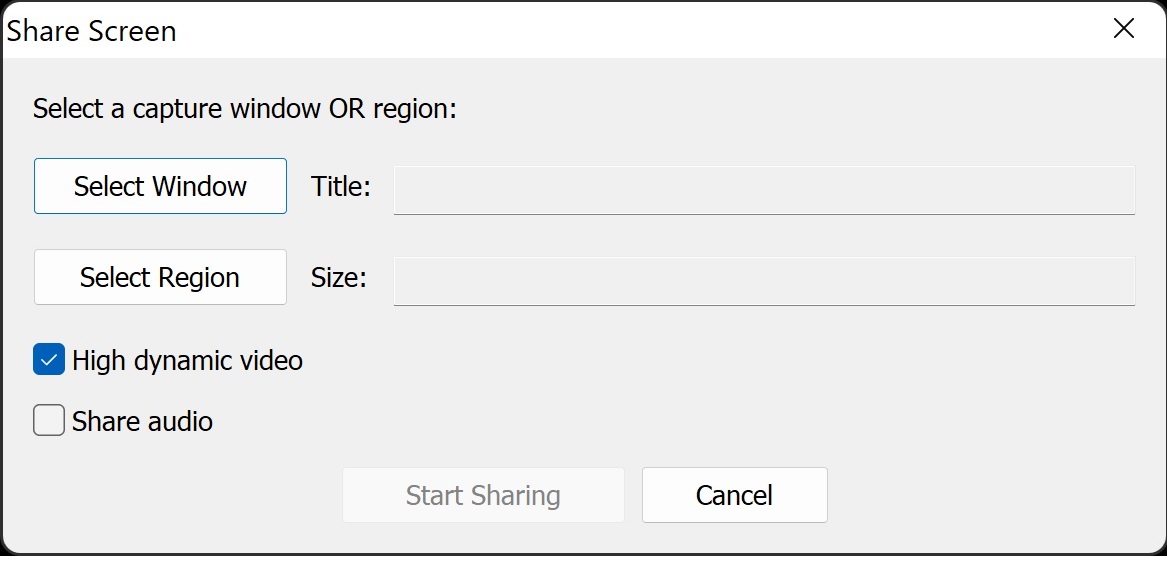
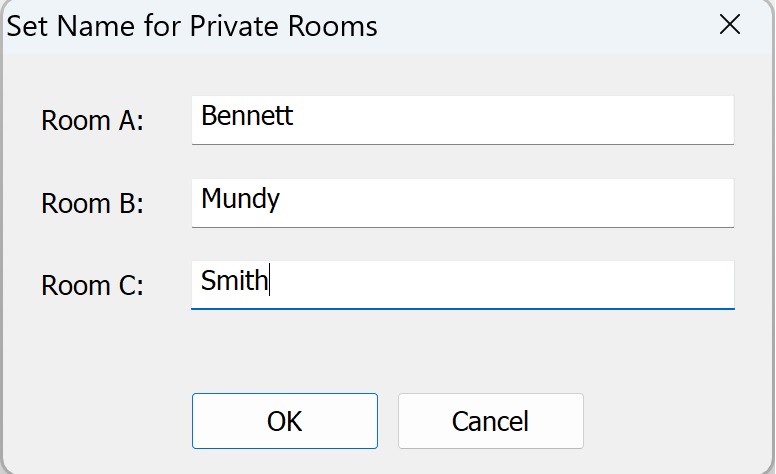
Set Name for Private Rooms This function lets you customize the names associated with the Private Rooms. These updated room names will appear on the automatic bookmarks that are created when participants are moved into private rooms. To set the names of private rooms:
Mute Local Channels This function lets you mute/unmute the audio of any of the local microphones. Note: muting an audio channel using this facility only stops the audio from being sent to the remote participants. The audio of muted channels is still captured and recorded into the recording file. To mute a local channel:
In the screen capture below, the WI (Witness) audio channel is muted and that local microphone's audio is not sent to the remote participants.
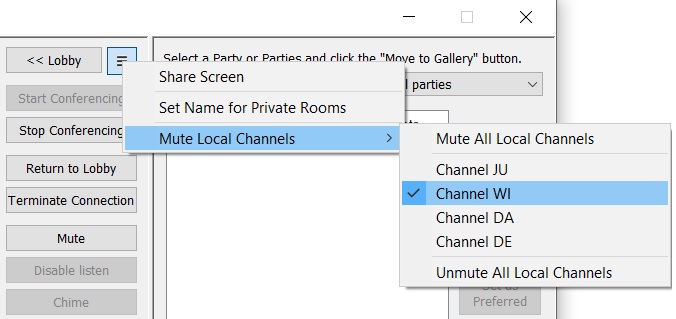
You can unmute a channel by deselecting it or you can unmute all local channels. Working with Participants in the Main Part of the Remote Conference Manager Window Once participants have been moved from the Lobby into the main Remote Conference Manager Window, they are managed by the controls available on that Window. Only the controls that relate to the selected participant will be active. To select a participant, left-click on the participant. You can use Ctrl+Click or Shift+Click to select more than one participant. Start and Stop Conferencing Controls
The Start Conferencing control is used to move selected participants into conference.
Conceptually, this moves participants from the courtroom gallery into the well of the court where they then become an active participant in the matter currently before the court.
In the "Conferencing" state they are heard by members of the court and their audio is recorded.
Return to Lobby Control The Return to Lobby control removes selected participants from the conference or the Gallery and returns them to the Lobby. When they are returned to the Lobby, they can no longer be heard by the court and are no longer recorded. Terminate Connection Control The Terminate Connection control removes selected participants from the conference or the Gallery and disconnects them from the conference server. In this case, the participant will no longer be seen in the Lobby until they re-initiate their session by logging back onto the conference server. Mute and Unmute Controls
The Mute control mutes the audio from the selected participants.
When muted, the participant's audio cannot be heard by other parties and it is not recorded.
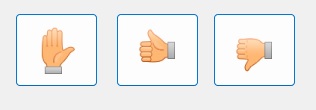
Enable Listen and Disable Listen Controls The Enable Listen control enables listening mode for the participant. This control toggles between "Enable Listen" and "Disable Listen", depending upon the current status of the selected participant. Chime Control The Chime control rings a chime on the participant's computer and presents a prompt to confirm their attention. This control is the same as the right-click option in the Lobby Panel. The chime can be used to alert the remote party and make sure they are aware of impending actions. Call Control The Call control is used to initiate a connection with supported conferencing systems that are sometimes used by corrections facilities. The Call control will not show on the Window unless it is enabled in the "Provide SIP Call support" checkbox of the Remote Conferencing options dialog Window. SIP connections must be pre-configured. Contact your service provider for additional details. Gesture Controls The Gesture controls allow the operator to add gestures to the local video stream, as seen by the remote participants. Gestures include "Hand up", "Thumbs up" and "Thumbs down", all as seen in the screen capture below.
Other Actions for Remote Conference Manager Participants
Right-clicking on a participant in conference or in the Gallery opens a menu as seen in the screen capture below.
You can also use Ctrl+Click and Shift+Click to select multiple participants before your right click.
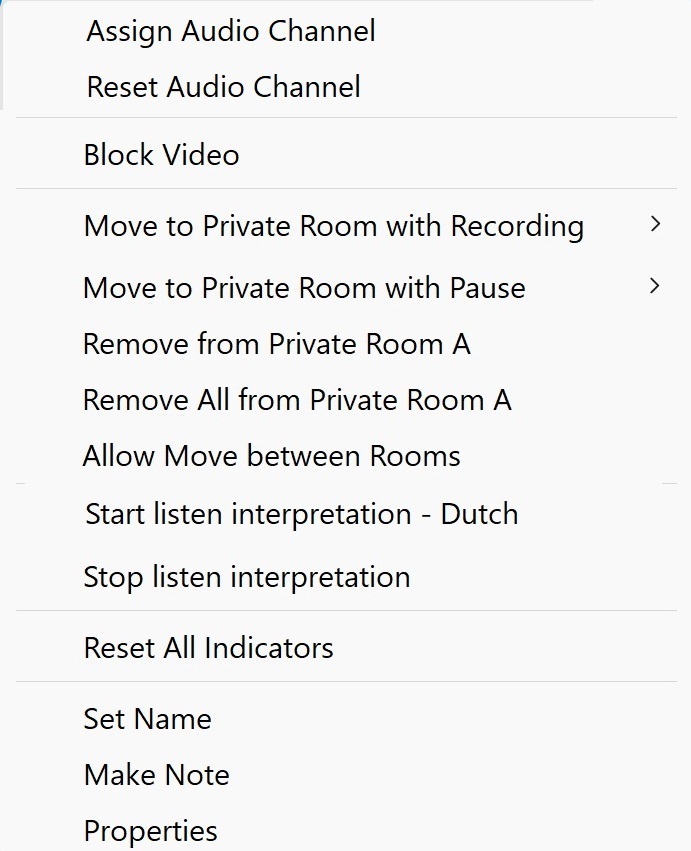
Each of these functions is described below.
Once placed into a private room, participants can only be heard by other participants who have similarly been placed into the same private room. They are not heard by participants in another private room, or by others who remain in the main courtroom.


Message Exchange Facility
The Message Exchange Facility
allows the operator to exchange messages and files with remote participants.
The operator may send messages to any remote participant but may send files only to remote participants who are in the Gallery or in Conference.

To send a message to a remote participant:
To send a file to a remote participant:
Primary Volume Control The Primary volume control allows the operator to adjust the volume level of the remote participants which is sent to the audio output device configured as the "Primary playback device" for Remote Conferencing. Event Log Facility
The Event Log control toggles the Event Log portion of the Window open and closed.
The Event Log contains a technical history of the connections made during the conference session.
Working with Video Streams By default, all of the video streams will appear in a single General Video Window. In many cases, the General Video Window will be moved into a large-screen monitor that can be seen by all of the parties in the courtroom. Right-clicking on any individual stream within the General Video Window opens the right-click menu as shown and described below.
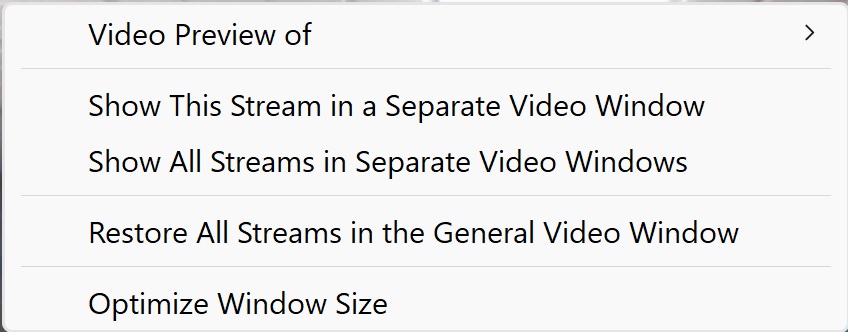
Video Preview of allows for the selection or deselection of video streams that appear in the General Video Window. Deselecting a stream removes the video for that stream from the Window. Reselecting the stream makes it appear again in the Window. This control works the same as the video camera icon on the Recorder's toolbar. Show This Stream in a Separate Video Window removes the right-clicked stream from the General Video Window and instead shows the stream in an isolated, separate video Window. You can move and resize the new window as required. Show All Steams in Separate Video Windows removes all the streams from the General Video Window and instead shows them all in their own, isolated, separate Windows. You can move and resize these new windows as required. Restore All Streams to the General Video Window closes all of the separate video Windows and restores all of the video streams to the General Video Window. Optimize Window Size resizes the included video streams to 100% of their size to present the videos as best as possible. Working with Video Streams in Separate Windows When a video stream appears in a separate Window, a View drop-down menu becomes available. The menu controls are shown and described below.
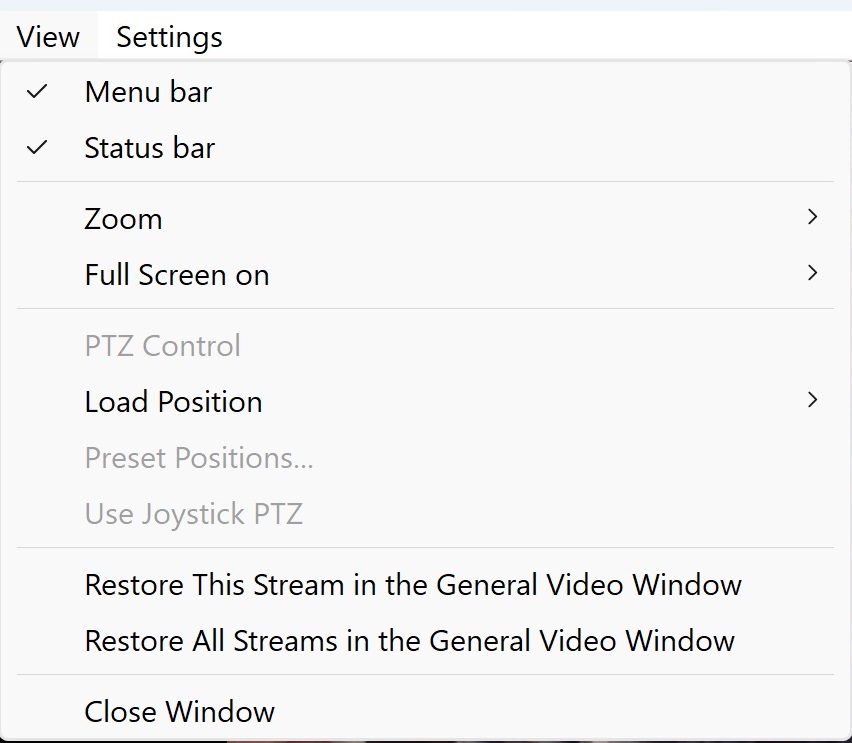
Menu bar determines if the Menu bar at the top of the Window (with the View and Settings drop-down lists) will be displayed. Right-click anywhere at the top of the Window to restore the Menu bar. Status bar determines if the Status bar at the bottom of the Window will be displayed. Zoom resizes the video stream by selecting the zoom size for the stream. Full Screen On allows for the current Window to become full screen on the selected monitor. PTZ Control opens a PTZ control Window for supported PTZ cameras. Load Position allows for the selection of pre-set PTZ camera positions, for supported cameras. Preset Positions allows for the definition of PTZ pre-set camera positions, for supported cameras. Use Joystick PTZ opens a Window whereby a PTZ camera joystick can be used to control a PTZ camera, for supported cameras. Restore This Stream to the General Video Window closes this separate video Window and restores this stream to the General Video Window. . Restore All Streams to the General Video Window closes all of the separate video Windows and restores all of the video streams to the General Video Window. Close Window closes the selected video Window. Hardware, Setup and Internet Connection Requirements for Running the Hybrid / Virtual Court
The court must address courtroom hardware, setup and Internet connection requirements to use the Hybrid / Virtual Courtroom.
Follow this link for details about the courtroom hardware, setup and Internet connection requirements for using the Hybrid / Virtual Courtroom
PDF Version of this Page
A PDF Version of this page, along with documentation about creating links and Phone Codes
may be obtained by following this link.
|
|
Copyright High Criteria Inc. 2005-2026. All Rights Reserved. |